Faculty Center Upgrade Coming April 14
Beginning April 14, a newly enhanced Faculty Center will be introduced in myFSCJ, offering a more intuitive interface and improved functionality for managing classes, reviewing rosters, entering grades, and tracking attendance. The update follows the quarterly maintenance of PeopleSoft Campus Solutions and includes mobile-friendly design, simplified navigation, and quicker access to frequently used tools.
The details and screenshots below outline the changes available to faculty, designed to provide a more user-friendly experience with embedded tools that minimize the need for navigating between multiple screens.

When faculty log in, they will land on the Faculty Center Homepage, where they will see a refreshed layout and the updated My Faculty Center tile—where many of the new interface improvements can be explored.

Selecting the 'My Faculty Center' tile will direct you to the enhanced 'Faculty Center,' which will automatically open the View My Schedule page.

Upon entering this page, you will notice that the My Schedule page has been replaced with 3 menu items (View My Schedule, Class Roster, and Grade Roster) in the Navigation Collection.
View My Schedule Page Features

A term list will be provided for any term in which the instructor is assigned to a class section.

By selecting a term in list, the instructor schedule will now appear in the active window, for that term.
There are several actions you can take while on this term-based teaching schedule page:

Transition between various terms by using the Change Term button.
The instructor's schedule is viewable by Class or by Date.
By Class - This is the default view in which classes are displayed.
By Date - On this page, you can select a valid date range from which classes are displayed. Initially, the FROM is set to the term start date, or is the term that has commenced on the current date. The TO is set to seven days after the current date.
Using the two checkboxes at the top of the page, faculty can select to Show All Classes or Show Classes with Enrolled Students.
Click the Printable Page button to open a pop-up window and print the schedule.
Each class section in this view displays up to three links: Class Roster, Grade Roster, and Exam Schedule. These links will only be active if the corresponding option is available for that specific section. If a link is grayed out, a message will appear to let the instructor know that the feature is not currently available for the class.

Class Details are available by clicking on any active section.

This action opens a pop-up window that contains all relevant class information.
The screenshots above were available via the By Class tab. Viewing By Date is another option. Here, there are two views: List View and Calendar View
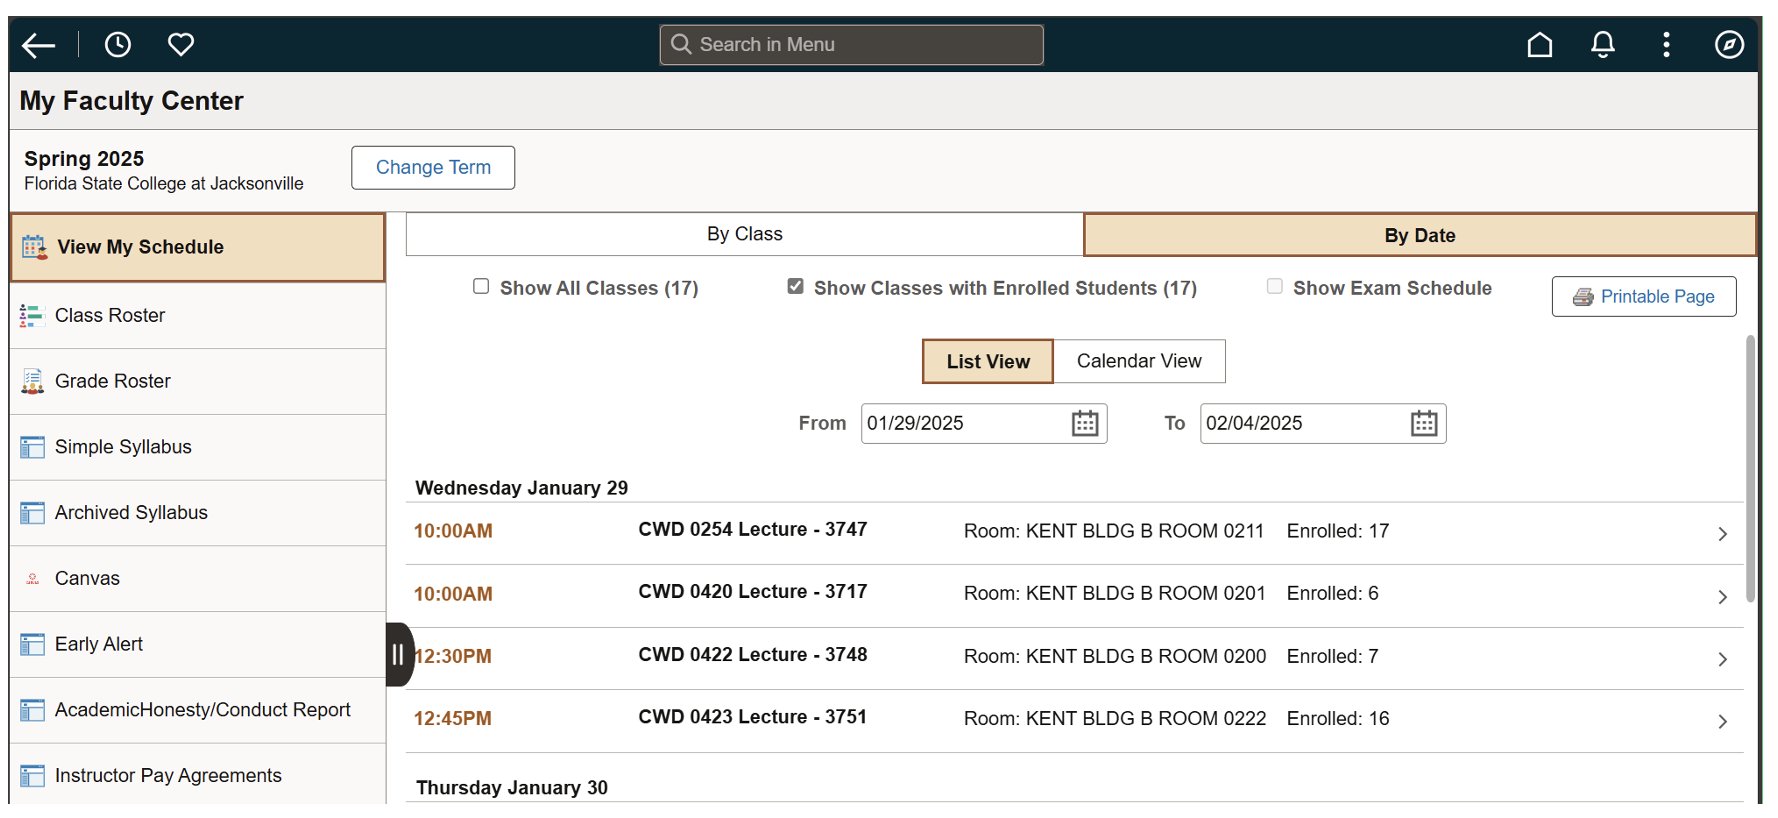
In the List View all sections assigned will appear row by row, by date and the date range is determine by the FROM and TO fields.

In the Calendar View the instructor will see their schedule in a calendar grid by week of, start time and end time and are clickable for more information.
Class Roster Page Features

The Class Roster can be accessed through the menu item on the left or use the direct link.
There are several actions you can take while on the Class Roster page:

Faculty can transition between various terms by using the Change Term button.
Faculty can transition between classes by using the Change Class button, which opens a pop-up to select another roster to view. Clicking the hyperlink below the class title also opens this pop-up but takes them directly to meeting details and the exam schedule for that specific section.
Click the Printable Page button to open a pop-up window and print the schedule.
The Get Last Certified Date button displays the last date a student was certified for attendance. During the Drop for NA window, a Certify and Save button will appear next to it, and the Drop for NA column becomes available for input. Once a student is marked for non-attendance and Certify and Save is selected, the Get Last Certified Date button will then display the certified date.


5. Select Download Custom Roster to view the class roster with additional fields requested.
6. Select View Photo Roster to view a class photo roster.
7. To view the attendance roster for a class, open the class roster for the desired section, then select the Show Attendance Roster button.

The Attendance Roster page defaults to the most current attendance date. To view all required attendance dates, check the Show All Attendance Templates box. Then, use the Action drop-down to open a specific attendance roster.

Select View Attendance Roster from the drop-down menu.

The class attendance roster opens in a new window, displaying a list of enrolled students. By default, all students are marked as Present—uncheck the box to mark a student Absent and select a reason from the Reason drop-down menu.
When attendance is complete, click Attendance Roster Save (Save and Return), then Attendance Roster Submit.
8. Within the roster options, there are three checkboxes—Enrolled, Waitlisted, and Dropped—that allow faculty to filter which students appear. One, two, or all three can be selected at the same time.
9. To email selected students, check the box next to each student’s name, then click Notify Selected Students. A pop-up window will appear where you can enter your message.


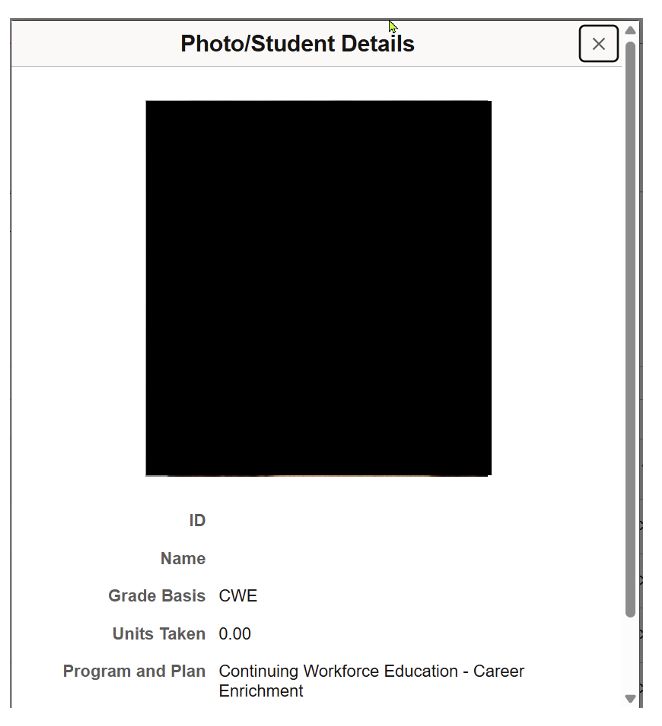
In the Student List, click on any student’s name to open a pop-up window displaying their full information.
The student’s photo will also appear on this page if one is available.
Grade Roster Page Features:

The Grade Roster shares a similar layout with the Class Roster but includes several key differences. The top section features familiar buttons such as Change Class, Change Term, Printable Page, a direct link to the Class Roster, and a Save button for updating grades.

The second section includes the Grade Roster Controls, where faculty can select the roster type—Final Grade or Mid-Term Grade—and use the Notify Students feature, similar to the Class Roster. A filter is also available to display only students who have not yet been assigned a grade.

The bottom section is where faculty assign grades. The “Apply this grade to selected students” button can be used with the drop-down menu to assign the same grade to multiple students at once. Grade Rosters become available once they’ve been generated for the class and the instructor has been assigned grade entry, approval, or posting access in the Schedule of Classes.
We hope the newly enhanced Faculty Center provides a more efficient, intuitive, and mobile-friendly experience for managing your classes in myFSCJ. If you have any questions, encounter any issues, or would like additional support as you explore the updated features, please don’t hesitate to submit a ticket at help.fscj.edu.